Science is the knowledge that binds the world together, and it can be absolutely fascinating to learn.
Contents
For some, science seems like a very complicated subject, with far too much theory to wrap your head around. However, science can also be taught in a way that makes it easier to understand, so that people of all ages can grasp the basics.
The best way to learn science is through experimentation so that you can see the science in action right in front of you.
When you think of science experiments, you might immediately think of a high-end laboratory with many different flasks and bottles of bubbling substances.

The mad scientist kind of vibe, or the highly complicated and advanced genius environment.
However, science experiments can also be extremely easy to do and highly accessible, with most of them being suitable for children too!
When it comes to weather experiments, most of them can be done with materials found in your own house, making them very simple to execute.
So whether you want to entertain children with a fun learning experience, or whether you want to experiment with weather science as an adult, we’ve found three great weather experiments that are super simple to do at home!
Weather Science Experiment 1: Tornado in a Jar
Tornados are as fascinating as they are dangerous.
In some areas, it is something children learn about pretty early on, so that they are aware of the safety procedures in case one forms nearby. But how are tornadoes formed?
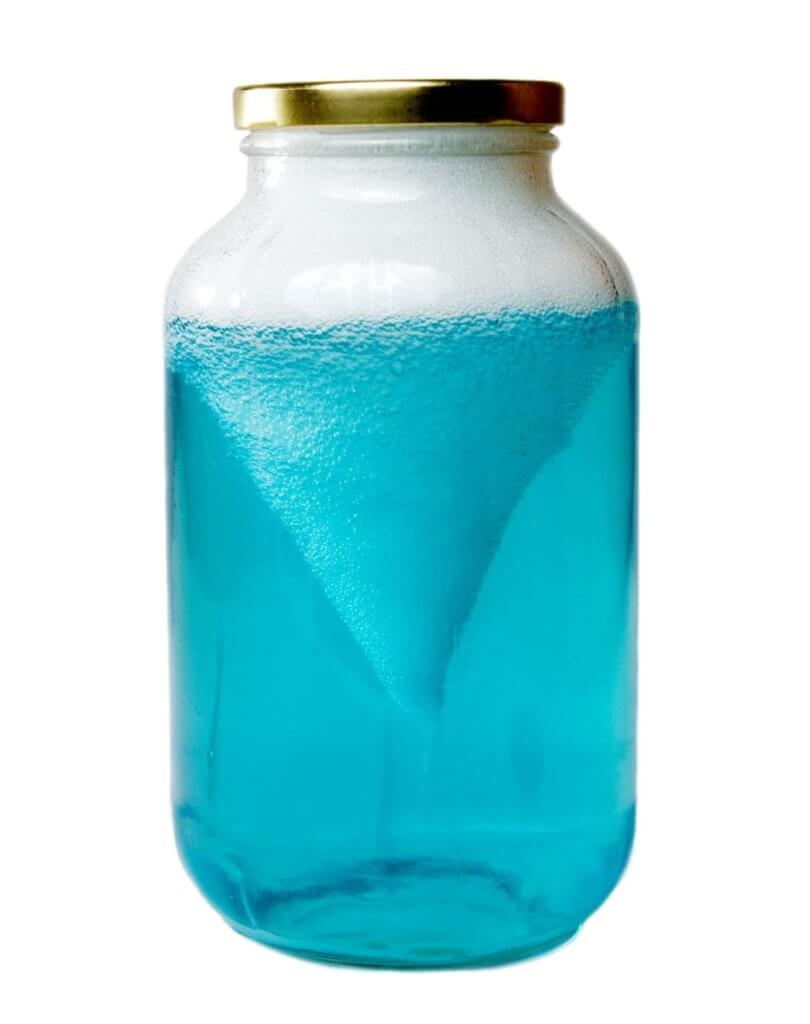
You can easily learn about them by creating a small controlled tornado inside a jar!
- Step 1:
Start by collecting all of the materials you will need for this experiment.
- 2 clear jars (clean and empty)
- 1 tornado tube (if you don’t have a tornado tube you can use duct tape)
- Optional: glitter and/or dish soap to make the tornado more visible and fun to watch!
- Step 2:
Fill the first jar with water, three-quarters of the way. (It doesn’t have to be super exact, just don’t fill it all the way)
- Step 3:
Add some glitter and/or dish soap. This is an optional step, but it is recommended to make the tornado more visible and more fun to watch! You could also add food coloring to make the tornado into a certain color if that’s what you want. Experiment with the experiment!
- Step 4:
Place the tornado tube on. This will screw onto the first jar so that the second bottle can then be screwed on top so that they are both connected.
If you don’t want to buy a tornado tube you can try connecting both jars with a strong layer of duct tape.
Make sure both bottles are securely connected so that the water can flow from one to the other without it spilling when they are turned upside down.
- Step 5:
Screw on or duct tape the second jar on top of the first bottle. Make sure it is secure so that the water won’t spill when you turn the jars upside down. This is your setup!
- Step 6:
When you turn the jars upside down, the water from the first jar will flow into the second bottle (now positioned at the bottom). As the water falls into the vacuum beneath, it will form a mini-tornado inside the first jar!

Weather Science Experiment 2: Making it Rain
Before children get to understand the science behind the rain, they make up all sorts of explanations for it.
From angels watering the earth to the clouds crying, there are all sorts of stories you can make up!
However, the science behind rain is extremely simple to explain and learn, and is a super fun experiment to do!
- Step 1:
Start by collecting all of the materials you will need for this experiment.
- 1 glass jar
- 1 plate
- Ice cubes
- Water
- Step 2:
Take the water and heat it up until it is boiling.
- Step 3:
Fill the glass jar up with the boiling hot water, up to a third of the way.
- Step 4:
Place the plate on top of the jar and let it sit there for a few seconds so that it warms up. You will notice that the jar is steaming up with the hot water, as it can’t escape now that it is blocked by the plate. (Be careful when balancing the plate so that it doesn’t fall off!)
- Step 5:
Place the ice cubes on top of the plate. This will cause the surface above the jar to cool down and become cold!
- Step 6:
As the steam from the hot water in the jar rises, it will reach the cold plate and condensate. Drops of water will form and slide down the sides of the jar from inside, making it rain!
Weather Science Experiment 3: Making Lightning
Storms can be as fascinating as they can be terrifying. For many, it is the thunder that can be scary.
Lightning is usually the prettiest part of a storm, as it lights up the sky in the dark. But how does lightning occur?
It can be tricky to try and explain, so it might be easier to just see it in action, by making some lightning with this easy home experiment!
- Step 1:
Start by collecting all of the materials you will need for this experiment.
- 1 styrofoam plate (can be found in takeaway shops!)
- 1 aluminum pie tin or recipient
- 1 pencil with an eraser at the end tip
- 1 thumbtack
- A wool sock (or any other woolen item)
- 1 fork (although you can also use your finger!)
- Step 2:
Take your thumbtack and place it through the middle of your aluminum tin or recipient, piercing right through it.
- Step 3:
Take the pencil, and stick it onto the thumbtack that is piercing through the aluminum recipient, by sticking it on to the thumbtack by its eraser side. This should leave the pencil standing upright in the center of the aluminum tin.
- Step 4:
Take your wool sock (or woolen item), and rub it on the styrofoam plate. You should rub it consistently for around 2 whole minutes. This will serve to build up static electricity. The faster and harder you rub it, the more static electricity you will be creating for your lightning.
- Step 5:
Place the aluminum tin with the pencil, and place it on top of the styrofoam plate. It should be set up so that the pencil is still standing upright in the center.
- Step 6:
Turn off the light (so that you can see the lightning properly). Now you can use the fork (or your finger) by placing it close to the edge of the aluminum tin, and a spark of lightning should appear!
Conclusion
Weather experiments are super fun and easy to do, with most of them being suitable to do at home with everyday items!
It’s a great way to learn about the science behind certain weather conditions, and it can be a fun way to spend time learning.
Creating a tornado in a bottle, making rain, and making lightning, are just three of many different experiments you can do! Give them a try!
As a parent of a five-year-old inquisitive boy, I have gained a lot of experience finding fun activities and toys to help him understand science and understanding our world in general. On this blog, you’ll find an extensive amount of tutorials, guides, and toys about Science, Technology, Engineering, and Math based on my personal experience to help your child develop critical STEM skills.


